This lovely Liberty tissue case has lived in my handbag for more years than I care to remember!
And, as you can see, the corners are now very much the worse for wear! So I decided that it was time for me to make a new one. If you follow me on IG you will have seen work in progress on this piece of embroidery.
I thought you might be interested to see where the design comes from and how I transfered it to my piece of fabric.
I have a few of these 'rubbing blocks' which I bought some years ago from Art Van Go. Some of the designs are not to my taste but this particular block has been well worth the purchase.
Tricky to photograph as it reflects but you should get the idea. It is about 6" square.
I stuck the block to my work surface with some blu tack and then sellotaped my fabric over it.
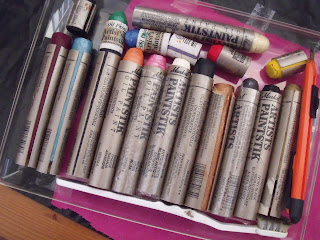
I then used one of my Markal oil sticks to make a rubbing.
I chose a pretty pearly pink which would glint through my stitching and anywhere else it happened to catch.
The fabric needs to be left for 24 hours and then is ironed, covered with a piece of baking parchment, with a hot iron. The oil is now set and you can get on with your embroidery. I used mainly chain stitch variations with some fly and feather stitches too.
And here is my finished tissue case.
I worked this piece of embroidery for a small bag some years ago using the same method.
Linking up with Super Mom No Cape and her Stitchery Link Party.
Now what are these doing flowering so early - they should not be in flower until May!
Have a great week everyone.


That is such a pretty bag and a unique way of making it. Thanks for laying it out step by step. You make it seem easy. I especially love the piece of embroidery using lots of pretty colored threads. That is rich and gorgeous.
ReplyDeleteoh my gosh Lin it's soooo pretty!!! It was lovely seeing how you did that - you are way too clever!!! I think I want one of these now but I'll have to find a tissue case to get a pattern first and I'm sure it won't be looking as gorgeous as that one of yours!!
ReplyDeleteWhat a cool idea that looks great......
ReplyDeleteWhat beautiful embroidery! I also love the bright pink colour for the material! Thank you for sharing how you made it x
ReplyDeleteIt is wonderful that you make an everyday item so very pretty. Your embroidery is beautiful.
ReplyDeleteWow,so beaitiful!!
ReplyDeleteGorgeous! I want to try this technique.
ReplyDeleteSuch a lovely idea and a very pretty addition to your handbag.
ReplyDeleteBeautiful embroidery on both the bag and tissue holder, such a clever way to transfer the design.
ReplyDeleteWhat a beautiful tissue case Lin and interesting way to transfer the design. Love the pretty colour too.
ReplyDeleteDare I say it, but I prefer your new case to your older Liberty one. The piping detail sets it off beautifully.
ReplyDeleteWhat an ingenious use of the rubbing blocks - a great success!
ReplyDeleteWhat a cool process! Great! Love how your stitcheries look.
ReplyDeletesuch a beautiful case. Thanks for showing all the steps. I like the idea of a rubbing instead of tracing the design. i must check out that website, thanks for the link and the inspiration.
ReplyDeleteThanks for linking up with Needlework Tuesday.
It looks lovely. Thanks for sharing the process too. Now I have an idea of what to do with my paint sticks. I'm going to try some rubbings around Ryde!
ReplyDeleteLovely! Although if I put that much work into a tissue case I wouldn't want it to reside in my bag! Love the first piece you did as well. What is that technique called again?...
ReplyDeleteI love that effect... did you also do the stitching on the one in the background of your blog? Great to see how you transferred the pattern too....
ReplyDeleteHugz
So beautiful Lin! I loved seeing the process too :D)
ReplyDeleteI love your new tissue case, it's BEAUTIFUL !
ReplyDeletexx
What a pretty little tissue holder! I love all the embroidered flowers.
ReplyDeleteThanks so much for linking up to last week's Stitchery Link Party and for the link back. Aloha hugs!
Beautiful work. Stitching and sewing. Thanks for sharing.
ReplyDelete